Need Help?
Let us help you find the right work tool for your machine! We’re also your source for maintenance tips and operator training.
Contact Us
Work Tool Maintenance Tip January, 2023
How to Maintain Your Grapple Attachments
Taking care of the attachments that lend your equipment its valued versatility is just as important as taking care of the equipment itself. Without all your attachments at your disposal, you could find yourself trying to utilize alternatives in a pinch, which means not doing the job right and possibly doing more damage. Either way, your grapples are a common attachment for equipment, and their snatching and clutching abilities are indispensable on work sites. By knowing how to maintain your grapple attachments you’ll extend the life span of your equipment, saving money on repairs and downtime now and replacements later.
Check for Tine Damage Daily
The key to a grapple’s operation is in its interlocking tines, these metal points need to be in proper alignment for the grapple to do its job correctly. A bent, broken, or worn tine tip compromises the entire operation by the grapple’s capacity. Trying to work with a damaged tine will only aggravate the damage and lead to an outright failure of the grapple. Don’t discover damage before it’s too late or try to work through it. Each day, inspect the attachment for any signs of significant damage before deploying your grapple. If you discover that a tine tip has fully worn down to the base or is otherwise not in proper condition, repairing or replacing it is a must.
Keep It Lubricated
Your grapple requires an application of grease for each day or every eight hours of operation. The locations that require greasing vary from model to model, but in general, you’ll want to grease the main pivot connection of the grapple and the position arm. If your grapple includes pins on the pivot and linkage connection, these will require grease as well. Don’t skimp on this—add grease to these locations until there is an excess, and then wipe off the runoff.
Build Up Your Grapples When Necessary
Over the course of regular use, your grapple will show signs of wear. Before the entire grapple fails, you can perform repairs on the attachment by building up the metal, rather than replacing the entire grapple will greatly extend the life of the attachment, obviating the need for a premature and costly replacement.
Even with an understanding of how to maintain your grapple attachments, time and tough assignments eventually wear out even the best grapples. You can only build up for so long before the metallic equivalent of a band-aid solution isn’t good enough anymore.
So, remember: your local Peterson Cat work tools expert is only a phone call away if you need help.
Work Tool Maintenance Tip December, 2022
Eight Tips to Prolong Your Construction Attachments' Lives
The number-one way to prolong your heavy construction attachments’ lives is to determine the right attachment for your machine and job. You should consider factors such as the condition of the jobsite and material composition. Attachments are specific for environments, machines, and substances; it’s vital to research the best fit for your application.
You never want to force attachments onto a piece of equipment that isn’t identified. Not only will it damage the attachment itself, it will harm the machine and decrease your efficiency and bottom line. It’s also a safety issue and can shorten the life of your equipment.
When you choose the correct attachment for each piece of machinery, you can prevent the need for extensive repairs or replacements. Here are some additional tips to prolong your attachments’ lives:
- Use attachments only within their operational perimeters
- Pay attention to hydraulic flows
- Wash and clean attachments after daily use
- Grease fittings to ensure proper lubrication
- Replace worn-out parts to keep attachments running under optimal conditions
- Swap out teeth and bolt-on edges of bucket
- Inspect loose sections and repair if necessary
- Refer to maintenance and operating manuals
Work Tool Maintenance Tip November, 2022
Couplers & Work Tools:
The Importance of Lubrication on a Regular Basis
Lubrication is a critical maintenance and service practice for keeping your equipment working properly in the field. This is especially true for quick couplers and other work tools. A good lubrication plan prevents:
- Difficulties in changing the work tool; eliminating coupler-wedge sticking issues during the disengagement operation, saving time, and avoiding damage on the work tools.
- Premature and inconsistent wear on the wedges and pockets. Lubrication on a regular basis will keep the wedges in good shape. Wear on the wedges results in component replacement with low hours, added cost and coupler rework, sometimes causing work tool and/or machine downtime.
And remember: your local Peterson Cat work tools expert is only a phone call away if you need help.
Work Tool Maintenance Tip October, 2022
Shear Tip and Blade Maintenance:
In shear applications, it can be easy to run the blades and tips past their recommended wear limits. Hours per blade edge or tip depend greatly on what type of material is being processed, or how much piercing must be done. Shears cannot cut everything, and some materials must be avoided and sent to a torch team instead. Hardened materials like axles and cylinder rods, castings, etc. can damage not only the blades, but the shear housing and jaw itself from the shock load after the cut is made.
Blade life can be increased by cutting material in the proper order. With new edges and shimmed tight, start with thin materials like banding and sheet metals. Then move into normal scrap like plate and structural steel. Finish with rebar, if necessary, before flipping or replacing the edges. Going out of this order can lead to early wear and increase the likelihood of jams.
Running with dull blades causes the shear to work at higher pressures to make cuts, which will shorten the unit’s service life and lead to more stress in the frame, which can cause weld failures. Severely worn blade edges in the shear jaw pocket limit the amount of blade surface area in contact with the pocket. This can make it difficult to keep the blade bolts tight and result in bolt torque loss or breakage.
Even though replacing blades and tips can seem expensive, staying on top of blade maintenance will increase productivity and extend the life of the shear.
And remember: your local Peterson Cat work tools expert is only a phone call away if you need help.
Work Tool Maintenance Tip September, 2022
Orange Peel Grapple:
Overall, Orange Peel Grapples are not a complex product, but there are some basic maintenance needs for a long service life (outside of regular greasing).
Start with the tips: they are made of a material that is designed to be long-lasting, but running on concrete, for example, can speed up the wear. Once the tips become worn, they will not contact each other, and the tine will resort to using the lower housing stops to limit the cylinder stroke.
This is the best time to replace the tips—the housing stops are designed to protect the internal cylinder from overextending from worn tips. If these also become too worn, cylinder failure becomes more likely. Visually inspecting these stops and repairing them when needed is a great check in addition to replacing the tips on time.
With the internal cylinders and hoses themselves, one of the first comments we receive is, “It must be difficult to repair or replace compared to an exposed cylinder design.” With the cylinders being internal to the tines, the risk of damage is a lot less, and thus should not need to be repaired as often. However, downtime is not much different than repairing an exposed cylinder design, as they are easy to remove and service.
Last, it is a good practice to open the tine covers a few times a month and clean out any debris that may have entered that could damage the hoses or cylinder.
And remember: Your local Peterson Cat work tools expert is only a phone call away if you need assistance.
Work Tool Maintenance Tip August, 2022
Excavator Bucket:
On many jobsites, the bucket of your mini excavator, skid steer loader or compact track loader is crucial for operations; without it, your machine is almost useless. So, to keep your bucket in good working order, it’s important that you maintain and replace the ground-engaging part of it, whether it’s the cutting edge or bucket teeth, before damage to the bucket can be done. With your bucket’s constant use and high price to replace, regularly replacing your blade or teeth isn’t just a good idea, it is a sound business practice. Here are some tips and tricks to maintaining your bucket.
Choose and Maintain the Correct Edge
When it comes to the wear component of your bucket, you have the choice of a straight edge (blade) or teeth. Blades can be either weld-on or bolt-on. If your bucket has a weld-on edge, make sure to watch it closely for wearing. If you allow the wear to recede into the bucket itself, you may find yourself having to replace the entire bucket. Bolt-on cutting edges are great because they’re reversible, giving you two usable edges before it must be replaced. Again, make sure that you’re changing/rotating your blade before wear gets to the bucket itself. Remember that the bolts need to be replaced every time you remove the edge; the threads get damaged in use. Save yourself some time and just cut them off with a torch when it’s time to rotate or replace your blade.
Bucket teeth drastically increase your ability to dig in adverse conditions such as rocky or compacted soil, clay, and when digging out roots. Like blades, teeth are subject to wear and may even fall off over the course of a project. Always inspect the teeth at the beginning of a shift and throughout the day. While it may be tempting to operate with some missing teeth, this will slow you down and end up costing more in the long run. Digging with an exposed shank will damage it; making it harder or impossible to replace the teeth later. To prevent this, make sure you keep a supply of extra teeth (and accessories) on hand to replace them as needed.
Regularly Inspect and Carry Out Preventive Maintenance
Your bucket doesn’t fall into the “set it and forget it” category. Just as you should be inspecting your machine daily, you should also be inspecting the bucket. On your walk around, visually inspect for flaws such as stress fractures, cracks, and undue wear on the metal components. Check that all the pins and bushings are in good working order and that all the bolts are nice and tight. This is also a great time to check the hydraulic connections between the bucket and machine. Remove any mud or debris that has accumulated around the coupler. Also, ensure that the hoses aren’t cracked or that the connections have loosened; this can result in the loss of hydraulic fluid, and therefore decrease performance. Catching problems early and carrying out routine maintenance will greatly improve the life of your bucket and your ROI.
Work Tool Maintenance Tip May, 2022
Competitive Work Tool Harness:
Harness for Kubota, John Deere, and Takeuchi skid steer loaders and compact track loaders
Have you ever wondered if you could run Cat Work Tools with multiple functions on your Kubota, John Deere, and Takeuchi Skid steer loaders and compact track loaders?
The answer is yes you can; it is as simple as plugging in the Work Tool harness between the work-tool plug and the machine plug.
The Work Tool harness installs on your machine in minutes and allows you to start working immediately. Get rid of compatibility headaches forever by calling your Peterson Cat rep today!
Work Tool Maintenance Tip April, 2022
Dozer Blade:
A Couple Minutes Can Save You Hours
Ensure a long life for your blade (and the G.E.T. that protects it) in three simple steps.
Clean surfaces, new hardware, and proper installation technique are shared as tips and tricks below:
- Clean and Pristine: Surfaces, bolts, and nut threads must be clean to ensure maximum clamping force. When installing, use new hardware—old bolts may have suffered metal fatigue
- Center Out: Cutting-edge bolts are installed from the center outward—do not install from both ends toward the center. End-bit bolts are installed first from the center outward, then from the center inward.
- Torque, Bang, Torque: First, tighten all bolts to the required torque. Then, while wearing safety goggles, seat bolt heads in the countersinks with a heavy hammer. Last, tighten the bolts again to the required torque.
What if you find something wrong?
Always follow the specific instructions for your machine. And remember: your local Peterson Cat work tools expert is only a phone call away if you need assistance.
Work Tool Maintenance Tip March, 2022
Excavator Bucket Inspection
Helpful inspection tips to increase your excavator bucket’s life and production
Your bucket doesn’t fall into the “set it and forget it” category. Just as you should inspect your machine daily, you should also inspect the bucket.
What should I look for?
Bucket inspection is a visual process. We’re scanning for any abnormalities, looking for potential indicators of structural wear or damage such as:
- Damaged or loose wear plate
- Over-worn bucket tips
- Cracks in bucket
- Cylinder leakage
- Stress fractures
- Pins and bushings
- Bucket is attached in alignment with the excavator arm
What if you find something wrong?
Like any other tool, the bucket on your excavator won’t perform correctly if it’s damaged. These performance reductions can range from minor inconveniences—an overworn bucket tip won’t engage crisply with the soil—to total and catastrophic failure, as in a stress-cracked bucket pushed past its limit.
Vigilance is key. Most damage can be identified and repaired long before it causes downtime or diminished performance.
Talk to your local Peterson Cat sales rep about repairing or replacing your worn or damaged Cat Work Tools. He’ll provide you with several options tailored to fit your budget, application, and timeframe.
Work Tool Maintenance Tip February, 2022
Skid Steer Brooms
Keep your SSL and CTL brooms more productive with these helpful maintenance and storage tips.
Maintenance:
- Check the manual to see what needs to be greased and how often.
- Check for wear on wafers. If the outside diameter is one half the original diameter, then the wafers need to be replaced.
- Check for loose, worn, or missing parts. Repair/replace as needed.
- Remove any foreign debris such as string, wire, or other objects that may have wrapped around the brush head.
- Inspect motor, valves, hydraulic fittings, and hoses for leaks and damage—make sure the machine is shut off and hydraulic pressure is relieved before checking for leaks. Never use your hands to check for high-pressure hydraulic leaks.
Storage:
- Don’t store brushes in direct sunlight. This can cause the material to deteriorate and crumble. And be sure to store them in a dry place.
- Place brooms on blocks or storage stands to avoid putting excess weight on the brush. This weight will deform bristles, greatly minimizing sweeping effectiveness.
Work Tool Maintenance Tip January, 2022
Brush Cutter
Nine Helpful Hints and Maintenance Tips to Increase your Brush Cutter’s Productivity
Brush cutting is a tough and sometimes unpredictable business. If you do any amount of brush cutting … You will break something. There are, however, a few active steps you can take to minimize unplanned downtime and expenses.
- Do you have the right brush cutter for the job? Often, we see customers begin with a light-duty unit because “they are only doing light work”. Be sure you are working within the manufacturer’s recommendations.
- Carefully inspect the area you will be mowing to find hidden objects, especially if it is the first time that the area has been cleared. The smallest things can wreak havoc on a cutter. Fence wire, for example, is a major killer for brush cutters and very time consuming to remove.
- Inspect your brush cutter thoroughly before each use. Due to the nature of the industry, every part of a brush cutter sees stress. The blades should be checked every few hours of use, especially if you’re working in a rocky area or cutting larger brush. Inspect the deck and drive assembly for any hairline cracks or stress areas and be sure all the bolts are tight. Check to ensure that all oil levels are full, and all grease points are greased and that you’re following the proper maintenance schedule.
- Check all bolts and nuts at least weekly for any signs of loosening, and then replace anything that’s broken. Due to the constant vibration in heavy brush, things tend to come loose. Make it a habit to check every time you enter the machine.
- Be sure hydraulic connections are free of debris before connecting them. Hooking up the hydraulic couplers can introduce dirt and debris into the hydraulic systems on your host machine and your cutter, which could lead to internal problems.
- Check the hydraulic flow range of the host machine and your cutter to be certain you are operating within the safe range. Now that high-flow can be run through the standard-flow couplers on a few skid steers, extra precaution must be taken to ensure you are not over-pressuring your brush cutter if it is not set up for high-flow. Permanent damage will occur, and a severe safety hazard can be created due to the blades turning much faster than they should.
- Be consistent while running the cutter. Starting and stopping the blades continuously or switching directions without stopping the unit will reduce the life of its motor. The continuous-flow function helps with this issue.
- Do not push the brush cutter excessively to the point it is continuously bogged down or on the edge of bogging as this can create unnecessary heat. If the cross-port relief valves are constantly opening, then heat is created, and problems will follow.
- Keep the deck clear of extensive buildup, especially around the motor area to allow proper cooling.
Work Tool Maintenance Tip December, 2021
Cat Work Tools
Prolong the life of your work tools with these routine maintenance tips
Proper maintenance is essential for the longevity and safety of any kind of work tool. These five tips will help keep your work tools in top shape.
Five Tips to Keep Your Work Tools in Top Shape
While you should be sure to reference your manual for specific maintenance checks, here are some of the basics that apply to your work tools:
- Check the fasteners often for proper tightness. Loose fasteners have the potential to compromise normally safe operating conditions.
- Before installing the work tool, remove any debris from the mount plates and make sure all the locking pins are greased and move freely.
- Store all work tools in a clean, dry space. Consider covering them for extra protection and cleanliness.
- Ensure safety and instruction labels on the work tool are always visible and intact.
- Always close the jaws of bucket work tools when they’re not in use.
Work Tool Maintenance Tip November, 2021
Cat Trenchers
Increase Your Trencher’s Lifespan
Your trencher’s lifespan is highly dependent on having a good daily inspection checklist and routine maintenance program. Careful attention to both will increase your trencher’s productivity and make it last longer.
Daily Inspection Checklist:
While you should be sure to reference your manual for specific maintenance checks, here are some of the basics that apply to your trencher:
- Eye Test: Walk around your machine and look for noticeable loose bolts, cap screws, fittings and bearings and confirm all safety shields are in place.
- Hoses: Inspect all hydraulic hoses to make sure they haven’t been damaged or pinched by the skid steer frame. Since skid steer trenching attachments often dig at 60- to 90-degree angles, hose pinching is possible. Pinching may cause hose rupture, collapse, or restriction, often resulting in leakage and/or overheating of the hydraulic system.
- Chain Tension: Check the sag distance while in the horizontal position.
- Leakage: Examine the idler wheel and head shaft area for excessive grease leakage to diagnose damaged seals.
- Greasing: The head shaft should be greased after every eight hours of use.
- Teeth: Inspect the digging chain to make sure all teeth are in place, in good condition, and the hardware around it is secure and tight on each link.
Routine Maintenance
In addition to daily inspection, a few routine checks are necessary to ensure peak trencher performance. The number of hours put on your machine will define the required timeframe of these checks. To be safe, perform the following a minimum of every three to six months:
- Cleanliness: To avoid overlooking worn or damaged components, clean the trencher with a power washer to eliminate all dirt, oil, and grease.
- Boom Wear: Examine the underside and top part of the trencher boom. Replace the wear strips if you see grooves cut into the boom caused by the side plates of the chain.
- Digging Chain Wear: The tighter the chain tension, the more wear you will see on the rollers that are in contact with the drive sprockets. Replace the digging chain if there is a scooped or beveled groove in the center of the roller wear strips.
- Digging Sprocket System: When replacing the digging chain, or after every couple hundred hours of use, be sure to replace the drive sprocket, as well—even if it’s not completely worn. A new digging chain will wear quicker if paired with a worn drive sprocket.
Work Tool Maintenance Tip October, 2021
Cat Mulchers
Increase Your Mulcher’s Lifespan
Your mulcher’s lifespan is highly dependent on good operator and maintenance practices: careful attention to both will increase your mulcher’s productivity and make it last longer.
Operation Tips:
- Use your mulcher for applications specifically designed for the tool, such as Under Brush and trees not any bigger than the diameter the head is designed for.
- Cut only material that the mulcher can easily handle. Avoid materials like rocks, dirt, etc.
- Replace cutters based on recommended wear specs.
- Don’t use the ground to stall the mulcher.
- Avoid running the mulcher with the rotor out of balance.
- Avoid excessive down force.
- Don’t grade or level with the mulcher.
- Don’t use the mulcher to assist the machine when turning or positioning.
Maintenance Tips
- Follow the recommended maintenance and inspection schedule in the Operation & Maintenance Manual.
Inspect Teeth / Cutters (inspect more often in hard working conditions 8 Hours Teeth / Cutters Tightening 40 Hours Belt Tensioning (first check) 8 Hours Belt Tension 40 Hours Inner Counter Blades 40 Hours Lubricate Rotor Bearings 8 Hours Extension Shaft 8 Hours Cylinder Pins 16 Hours - Replace worn cutters when past their wear specifications.
- Remove panels, and then clean debris from the mulcher periodically to keep it running at optimal performance.
Work Tool Maintenance Tip September, 2021
Hammer Tool Selection
The most abused part of a hammer is often the tool used at the end. Choosing the right tool for your application will ensure that the hammer AND the tool live well beyond your current job. Caterpillar offers a wide range of hammer tools for every application, many which can be used for multiple applications, giving you the best value for your dollar. Choosing the right one is your first step.
Here is list of the most common hammer tools and the application they were built for. Now, let’s do the work!
- Cone Tool
This is a multi-use tool that can make circular holes in soft material. The point improves speed of penetration, but there is no control of fracture direction. For use on concrete, bedrock, and hard rock. - Blunt Tool
The blunt tool shatters with vibration instead of penetration. It’s intended for use on concrete, soft rock, coal/shale, irregular-shaped objects, and while operating on slopes. - Chisel Tool (inline & crosscut)
The chisel tool provides a controlled and accurate fracture line. It’s best used on pavement; concrete bedrock; trenching; and while operating on slopes or cutting lines. - Moil / Pyramid Tool
This is a general-purpose tool—the point improves speed of penetration. It’s appropriate for use on pavement, concrete, bedrock, hard rock, and trenching.
Work Tool Maintenance Tip August, 2021
Augers
Daily maintenance routine: Inspect teeth for wear and damage, and replace as needed. Check to make sure bits are in place and all bolts are tight. Additionally, be sure to inspect the auger for cracks and lubricate the pivot pin on top of the drive motor head.
Work Tool Maintenance Tip July, 2021
Contractor Grapple Maintenance
Maintenance on Cat Grapples is not an overly complex subject, but can sometimes be done incorrectly which leads to early hour wear and failures.
As always, greasing is important no matter what the tool or machine we discuss. However, it is extremely critical the main pivot group is properly greased daily. Daily, this pin group should be liberally greased and cycled a few times while greasing to make sure the bearings are adequality covered. The pin is held in place with a pin keeper or lock to prevent it from turning during operation. If there is a lack of grease, it is possible for the bearings to grab the pin and cause it to rotate, which will destroy the locks and cause damage to the grapple group.
Wear is another area to keep close attention to on the tine groups. Each tip has a wear plate on the front and back, and below those wear plates are welds and the main structure plate to the grapple tine. The wear plates must be replaced, or built back up, or reinforced before the welds and the main structure plate are exposed. If they become worn, replacing or fixing this area can become difficult and expensive. There are optional wear plate replacement kits if needed in REHS3170 in SIS.
Work Tools Maintenance Tip June, 2021
Cold Planers
- Daily maintenance routine: Always check to make sure the conical bits are rotating and turning properly before operation of the cold planer. Grinding dust from asphalt and concrete can work its way into the conical bits during operation and cause them to stop rotating. Therefore, these bits should also be inspected hourly to make sure they are rotating properly while in service. Use caution because bits become very hot during operation, and always use a pair of thick gloves or pliers to check rotation. If the attachment continues to run while the bits are not rotating, damage can occur to the bit holders and the drum itself.
- Weekly maintenance routine: Lubricate the planer depth control cylinder ends and the control shafts. Inspect the drum frame and adjustable skid shoes for wear, and replace them as needed.
Work Tools Maintenance Tip May, 2021
Angle Brooms
- Operational tips to prevent maintenance issues: Angle brooms are used in a wide variety of applications, including parking lot, airport runway, street and milling clean-up, to name a few. To help ensure a long service life, there are several operational tips to keep in mind. Continuous use of the broom angled in one direction, excessive bristle engagement and/or applying too much down pressure without proper adjustment of the broom can cause premature wear of the bristles. Therefore, the broom should be adjusted to a position in which the bristles are just slightly engaging with the pavement during operation.
- Daily maintenance routine: Inspect the broom bristles daily; look for uneven wear, premature breaking or bristle loss. Visually inspect the broom for damage—making sure the fasteners are tight, pivot points are not worn and the chain is properly adjusted. Refer to your angle broom operation and maintenance manual (OMM) for chain adjustment instructions. Apply lubricant to the outer bearing and inner bearing on the bristle side.
- Bristle replacement tip: Angle broom bristles should be replaced when the outer diameter has worn down to 22 inches (560 mm) and the exposed bristle length has reduced to 5 inches (125 mm).
Work Tools Maintenance Tip April, 2021
Couplers & Work Tools:
The importance of lubrication on a regular basis
Lubrication is a critical maintenance and service practice for keeping equipment working properly in the field. This is also true for medium wheel loader Cat quick couplers and other work tools. A good lubrication plan prevents:
- Difficulties in changing the work tool, eliminating coupler wedge sticking issues during the disengagement operation, saving time and avoid damage on the work tools.
- Premature and inconsistent wear on the wedges and pockets. Lubrication on a regular basis will keep the wedges in good shape. Wear on the wedges results in component replacement with low hours, added cost and coupler rework to shim the pockets, sometimes causing work tool and, or machine down.
Fusion Quick Coupler - Operation and Maintenance Manual - Media Number SEBU7617 is available on catpublications.com and can provide more information and details such as:
- Application of lubricant to grease fittings onthe coupler wedges
- Application of lubricant to all the insidesurfaces of coupler wedge pockets and thework tool
Work Tools Maintenance Tip March, 2021
Power Box Rakes
Daily maintenance routine: Always check for any loose hardware and tighten, if necessary. Visually inspect tires and rims. With tires elevated off the ground, move the wheels side-to-side to make sure that the bearing or axle they ride on is not showing excessive wear.
Weekly maintenance routine: Tire pressure should be checked weekly. It’s important to maintain 60 psi of tire pressure. If pressure is very low, the tire can detach from the rim. Lubricate the pivot plate and bolt, caster mount brackets and roller bearings weekly or after every 10 hours of service. Lubricant levels should be at the same level as the lubricant level hole; add fluid gear grease through the filler plug hole, if necessary.
Work Tools Maintenance Tip February, 2021
Tip and Blade Maintenance
In shear applications, it can be easy to run the blades and tips past their recommended wear limits. Hours per blade edge or tip depend greatly on what type of material is being processed, or how much piercing must bedone. Shears cannot cut everything, and some materials must be avoided and sent to a torch team instead. Hardened materials like axles and cylinder rods, and castings can damage not only the blades, but the shear housing and jaw itself from the shock load after the cut is made.
Blade life can be increased by cutting material in the proper order. With new edges and shimmed tight, start with thin materials like banding and sheet metals. Then move into normal scrap like plate and structural steel. Finish with rebar if necessary before flipping or replacing the edges. Going out of this order can lead to early wear and increase the likelihood of jams.
Running with dull blades causes the shear towork at higher pressures to make the cuts, which will shorten the overall service life of the unit and lead to more stress in the frame which can cause weld failures. Severely worn blade edges in the shear jaw pocket limit the amount of blade surface area in contact with the pocket. This can make it difficult to keep the blade bolts tight and result in bolttorque loss or breakage.
Even though up front replacing blades and tipscan seem expensive, staying on top of blademaintenance will increase productivityand extend the life of the shear.
Work Tools Maintenance Tip January, 2021
Hammer Annual Repair
Annual hammer service, rebuild/reseal, is an important service interval that helps keep operating cost down, and extends the life of the hammer. Annual hammer service is defined as once per year, or every 1,000 machine hours for Performance hammers, or 600 machine hours for GC Silenced hammers.
Rebuilding the hammers at these intervals allows an experienced hammer technician the chance to closely inspect all internal parts such as the piston, cylinder, tie rods, valving, etc. Small issues can be corrected before they turn into major costly failures.
For example, removing the piston and discovering pitting or rust on the surface. This can be polished out instead of letting it become more severe where the whole piston needs to be replaced. Another example is finding one cracked tie rod from running with worn bushings or tools. Bushings and tools can be replaced before the rest of the tie rods or even the front head pockets crack, which is a costly repair.
What has been typically observed is waiting for rebuild until the hammer is leaking oil, does not fire, or low performance. Using this method, the repair bill can be in the tens of thousands of dollars, and can create a situation where it might not be cost effective to rebuild the hammer at all.
Work Tools Maintenance Tip December, 2020
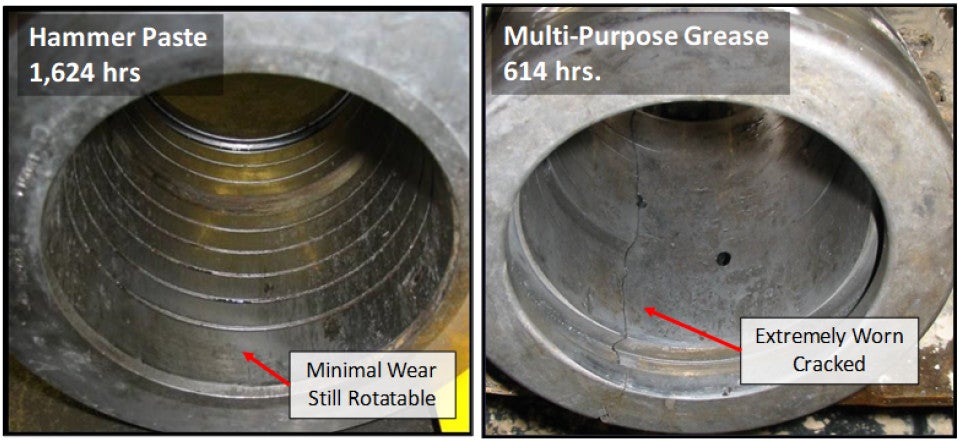
Why is Hammer Paste required for greasing hammers?
Hammer Paste is similar to a high temperature anti-seize. During normal hammer operation, extremely high temperatures and pressures can be present between the tool and the bushings which can cause them to fuse together and wear out faster.
Hammer Paste creates a layer of protection between the wear parts using an aluminum complex with other additives, and has an operating range from -20 to 1,100C (-4 to 2012F). Any other type of lubrication used will melt and run out early, providing no protection to the hammer, increasing downtime and operating cost.
Worn tools and bushings are also the leading cause of most other hammer failures, such as damaged pistons, cracked tie rods, and cracked front heads.
Work Tools Maintenance Tip November, 2020
Pin Grabber Coupler Daily Maintenance
Daily maintenance is an important part of keeping your pin grabber coupler working correctly. Often this step is overlooked, primarily due to the thought that if there is no plan on removing the attachment today, this week, or this month, then there is no need to inspect or grease the coupler.
The coupler must be greased and cycled daily, even if there is no plan on removing the attachment. This procedure only takes a few extra minutes. Constant pressure is continuously pushing the wedge of the coupler out to keep the attachment tight and secured. If the coupler is not cycled in a long time, there is a chance the wedge could become stuck.
If the wedge becomes stuck, there is a tendency to slam the tool into the ground to free it up. This can not only cause failures to the wedge, but also bulge the cylinder walls from pressure spikes.
One other factor to consider is the attachment pin quality. If the attachment does not have chrome hardened pins, pin wear such as flat spots on the bottom side of the pin, can increase the possibility of a stuck wedge.
Work Tools Maintenance Tip October, 2020
Next Generation Hydraulic Work Tool Programming Tips
Two common causes of tool failures that come up, especially in rental applications, is running tools on the wrong work tool program and running a hammer more than the specified time of 15 seconds in one location. Both can shorten service life or result in immediate tool failure. With the Next Gen Excavators, there are settings to help eliminate risk from these issues.
To prevent an operator from selecting the wrong tool program, there is an option to turn off visibility for all unneeded tool programs. In the tool program menu behind the service master password is a setting called "Tool Program Display" in the Basic Settings. This can be set to Disabled, which hides the tool program in Work Tool Select Menu, preventing it from being selected.
For hammers, there are a few options to prevent running the hammer in one spot for too long. In the tool program menu behind the service master password are settings called "Hammer Indicator Enable Status" and "Hammer Auto Stop" in the Basic Settings. With the Indicator set as Enabled, a Warning will sound and pop up on the monitor directing to stop hammering and move to a new location. With the Auto Stop Enabled after 30 seconds, the hammer circuit will shut off and force the operator to move to a new location before the hammer can be activated again.
 WARNING